Using a Le Creuset Dutch oven to bake bread is a joyful and satisfying experience. When cooking bread, using a Dutch oven—especially one manufactured by Le Creuset—brings many advantages that produce artisan-style loaves with delicious textures and crispy crusts.
What is a Le Creuset Dutch Oven?
httpss://www.youtube.com/watch?v=lH6BGoBwgmI
A Le Creuset Dutch oven is a multipurpose cast iron dish that has excellent heat distribution and outstanding heat retention. It has a top that fits snugly. Because it replicates the atmosphere of a professional bread oven, this makes it the perfect vessel for baking bread.
A Le Creuset Dutch oven can be used for frying, roasting, stewing, braising, and baking bread. Its enamel covering and sturdy construction make it stain- and dulling-resistant as well as easily cleaned. Foods turn out tender and tasty because of the tight-fitting lid’s ability to hold moisture and flavour inside the pot. The broad spectrum of vivid colours also gives any kitchen a hint of refinement, making it a fashionable addition to your cookware collection.
A Le Creuset Dutch oven is a flexible kitchen appliance that makes cooking tasty meals easy, regardless of experience level. Its design guarantees that it will survive for many years, and its versatility from hob to oven makes it a perfect option for one-pot cooking. Thus, if you’re searching for a sturdy and fashionable kitchen appliance, a Le Creuset Dutch oven is unquestionably something to think about.
Le Creuset Dutch Oven for Bread Baking
When using a Le Creuset Dutch oven for bread baking, it’s important to preheat the oven along with the pot to ensure an even baking process. The preheating stage is crucial for achieving a crispy crust and a well-developed texture in the bread. To start, put the Dutch oven in the oven, lid on, and preheat it to the desired temperature for your bread recipe. This will provide the ideal baking environment by enabling the pot to heat up uniformly and hold the heat.
After the oven and Dutch oven have reached the proper temperature, remove the pot and set it aside on a heat-safe surface. Then, carefully place the risen bread dough into the hot pot using oven mitts or a kitchen towel to protect your hands from burns.
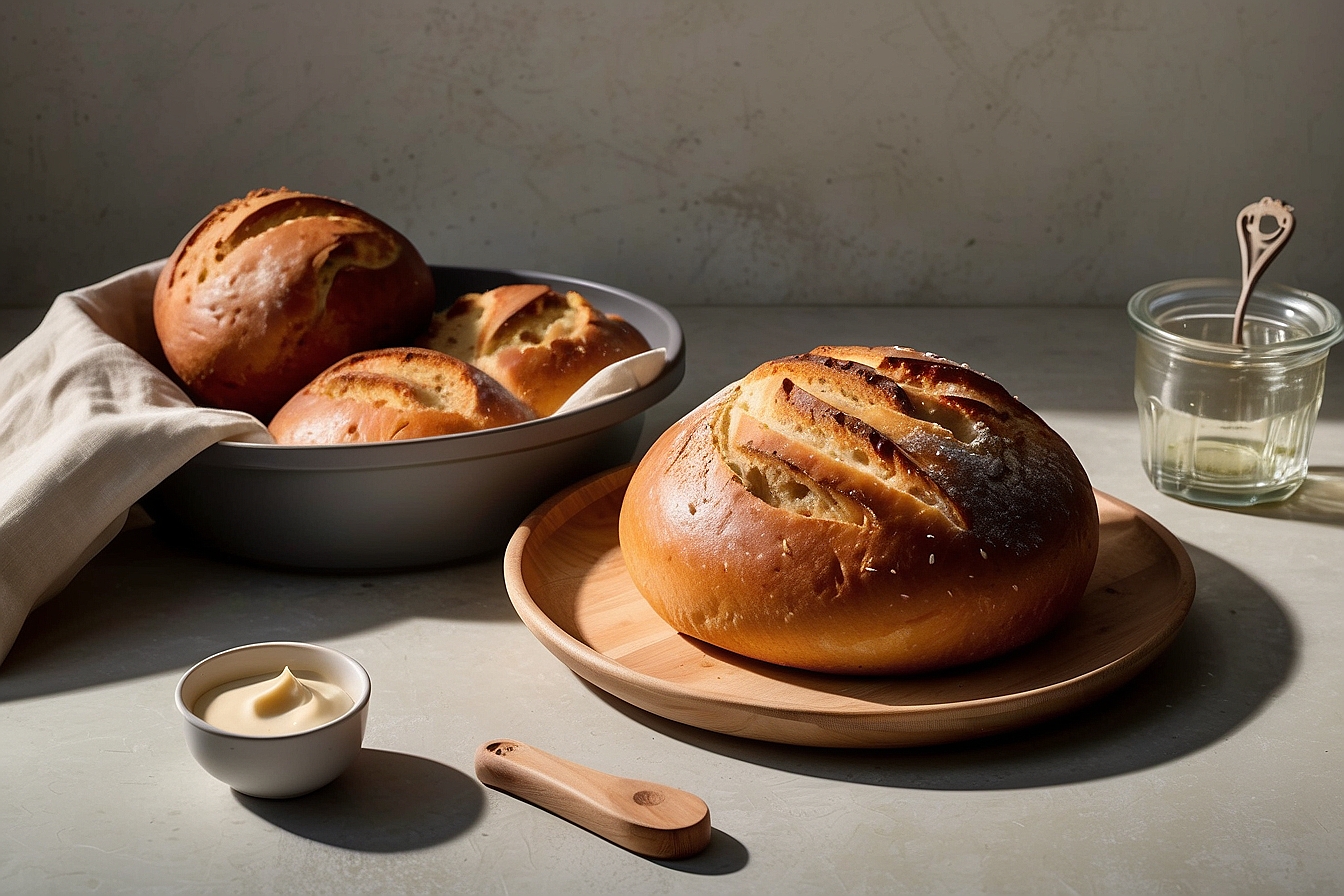
To bake the bread, immediately replace the pot’s lid and return it to the oven. Steam is produced by the Dutch oven’s enclosed space, which aids in developing a crispy crust and a light, airy texture. Next, carefully remove the bread from the pot using a spatula and place it on a wire rack to cool. With the right preheating and baking technique, using a Le Creuset Dutch oven for bread baking can result in beautiful loaves with a professional bakery-quality crust and texture.
Benefits of Using a Le Creuset Dutch Oven for Bread
The benefits of using a Le Creuset Dutch oven for bread baking are manifold. The even heat distribution ensures that the bread bakes uniformly, while the tight-fitting lid helps retain moisture, resulting in a beautifully crispy crust. Additionally, the cast iron material enhances the flavour and texture of the bread, giving it a more artisanal quality.
Furthermore, Le Creuset Dutch ovens withstand high temperatures, so they are perfect for baking bread at the high heat required to achieve a perfect crust and crumb. The durable enamel coating also makes it easy to clean and maintain, ensuring that the Dutch oven can be used for years to come.
Using a Le Creuset Dutch oven for baking bread also allows a versatile baking experience. The pot can be used for various bread recipes, from crusty artisan loaves to softer sandwich breads. The Dutch oven can also be used for other cooking purposes, such as soups, stews, and braises, making it a valuable and multi-functional tool in the kitchen.
Overall, the Le Creuset Dutch oven is a highly effective and reliable tool for bread baking, producing consistently excellent results and adding a touch of artisanal quality to homemade bread. Using a Le Creuset Dutch oven can elevate your bread-baking experience and help you achieve professional-level results at home.
Proper Care and Maintenance of Le Creuset Dutch Oven
To maintain your Le Creuset Dutch oven, it’s important to clean and dry it thoroughly after each use. Avoid drastic temperature changes, and season it regularly to ensure its longevity.
Here are some tips for maintaining the quality of your Le Creuset Dutch oven:
Clean and dry thoroughly: Hand wash your Dutch oven with hot, soapy water and a soft sponge after each use. Harsh scrubbers and abrasive cleansers should be avoided as they can harm the enamel finish. Ensure the Dutch oven is well-dried before storing it to avoid rust or discolouration.
Steer clear of abrupt temperature fluctuations: When using your Dutch oven, stay away from abrupt temperature changes. For example, don’t submerge a hot Dutch oven in cold water or expose it to intense heat. Over time, this could lead to chipping or cracking of the enamel.
Season frequently: You can season your Dutch oven regularly to preserve the enamel coating’s non-stick qualities. Just lightly coat the inside surfaces of the Dutch oven with cooking oil and preheat it on low for one hour. This will maintain the smoothness of the enamel and shield food from sticking.
How to Make Bread Using a Le Creuset Dutch Oven
Making bread in a Le Creuset Dutch oven involves a few essential steps to achieve the perfect loaf. From kneading and preparing the dough to the baking process, each stage contributes to the creation of a delightful artisan-style bread.
Steps for Kneading and Preparing the Dough
The first step in baking bread in a Le Creuset Dutch oven is to knead the dough on a floured surface until it is elastic. Before shaping and putting the dough in a parchment-lined, preheated Dutch oven, let it rise. Next, use a sharp knife to score the dough’s surface to make room for expansion during baking. After that, put the Dutch oven’s lid on and put it in a preheated oven.
Bake the bread with the lid on for the first half of the baking process to generate steam within the pot and enable the crust to crisp and brown. Remove it from the oven after baking the bread as the recipe directs. To slice and serve, move the bread to a wire rack to cool. Savour the bread you prepared yourself!
Baking Process Inside a Le Creuset Dutch Oven
The covered environment facilitates steam creation when the dough is placed inside the preheated Dutch oven, giving the bread an excellent rise and an enticing aroma. After a given time, the lid is removed to allow the bread to brown and form a delightful crust.
Tips for Achieving the Best Results with Le Creuset Dutch Oven Bread
For the best results when using a Le Creuset Dutch oven for bread baking, it’s crucial to closely monitor the baking process and adjust the temperature as needed. This ensures that the bread achieves the desired level of browning and texture.
Once the dough is ready, carefully take it out of the oven, wearing your oven mitts. Put the dough into the preheated Dutch oven and cover it with the lid. Bake the bread according to the recipe’s instructions, but keep an eye on it throughout the baking process.
If the bread is browning fast, reduce the temperature slightly. If the bread isn’t browning as desired, increase the temperature slightly. This level of control is one of the key benefits of using a Dutch oven for bread baking. Always use oven mitts when handling the hot Dutch oven and its lid. When the bread is finished baking, take it off the Dutch oven and let it cool on a wire rack before attepting to slice it.
Benefits of Using a Le Creuset Dutch Oven for Bread Baking
Baking your favourite bread in a Le Creuset Dutch oven offers several advantages, including the exceptional heat distribution that results in uniformly baked loaves. The moisture retention within the pot leads to a crispy crust, while the cast iron material enhances the bread’s flavour and smooth texture.
Even Heat Distribution in Le Creuset Dutch Oven
The even heat distribution in a Le Creuset Dutch oven ensures that the bread bakes uniformly, without any hot spots that could lead to uneven cooking.
This makes it perfect for baking all types of bread, from crusty artisan loaves to soft sandwich bread. The Dutch oven’s heavy cast iron construction also helps create steam inside the pot, which is essential for achieving a crispy bread crust.
Additionally, the tight-fitting lid of the Dutch oven traps moisture, creating the perfect environment for baking bread. This helps ensure the bread has a light, airy crumb and beautiful golden crust. A Le Creuset Dutch oven is a good choice for baking bread, as it provides even heat distribution, steam, and a tight-fitting lid to help you achieve bakery-quality loaves at home.
Retaining Moisture and Creating Crispy Crust with Le Creuset Dutch Oven
By utilising the covered environment of a Le Creuset Dutch oven, the moisture released from the bread helps create a delectably crispy crust, providing a delightful contrast to the soft crumb. The even heat distribution ensures the bread bakes evenly and develops a wonderfully golden-brown colour. The heavy lid also traps steam, which helps the bread rise and develop a light, airy texture.
Le Creuset Dutch ovens’ enamelled cast iron construction also ensures excellent heat retention, so the bread stays warm and fresh for longer after baking. Plus, the non-stick feature makes it easy to remove the bread once it’s done baking. The Le Creuset Dutch oven is a good tool for baking bread, providing a perfect environment for achieving a beautifully crispy crust, soft crumb, and delicious flavour.
Enhanced Flavor and Texture of Bread Baked in a Le Creuset Dutch Oven
The Le Creuset Dutch oven’s cast iron construction gives the bread a distinctive flavour and texture that raises it to an artisan-quality level that is difficult to accomplish with conventional baking techniques. The Dutch oven’s tight-fitting cover produces a steamy interior, which aids in producing the ideal crust for the bread.
The bread is baked wholly and consistently thanks to the cast iron’s excellent heat distribution. A useful addition to any kitchen, the Le Creuset Dutch oven is also quite adaptable and may be used for various cooking activities. Whether you’re braising meats, deep-frying, or simply simmering soups and stews, the Dutch oven can easily handle it all.
With its high-quality construction, it is a kitchen essential that will last for years to come. Experience the difference this exceptional cookware can make in baking and cooking.
Common Mistakes to Avoid When Baking the Bread
While baking bread in a Le Creuset Dutch oven offers various advantages, common mistakes should be avoided to ensure the best results.
Over-Proofing the Bread Dough Before Baking
Over-proofing the bread dough can lead to a lack of oven spring, resulting in a dense loaf with an undesirable texture. Monitoring the proofing process closely is essential to achieve the perfect rise.
There are a few ways to prevent over-proofing. First, make sure to use the right amount of yeast and flour in the dough recipe. Using too much yeast can cause the dough to prove too quickly, leading to over-proofing. Keep an eye on the dough while it is proofing, and test it periodically by gently pressing a finger into the dough. The dough is prepared for baking if the indentation is still there. If it resurfaces, more time is required for proof.
Maintaining control over the proofing environment’s humidity and temperature is also crucial. While the dough may move too quickly in a warm, humid environment, the proving process may take longer in a colder one. Achieving the ideal texture and rise in the finished loaf requires finding the correct proportion.
The proofing time is recommended in the recipe and adjusted accordingly based on the environmental factors and the behaviour of the dough. With careful monitoring and proper adjustments, you can avoid over-proofing and achieve a light and airy loaf of bread.
Not Preheating the Le Creuset Dutch Oven Properly
Proper preheating of the Le Creuset Dutch oven is essential to ensure the ideal baking environment and the formation of a crispy crust. Failing to preheat the pot adequately can lead to uneven baking and texture in the bread.
To properly preheat your Le Creuset Dutch oven for bread baking, follow these steps:
Place the Dutch oven (with its lid on) in the oven and preheat it to the desired temperature, typically between 450-500°F (230-260°C). Allow the Dutch oven to preheat for at least 30 minutes to ensure it is thoroughly heated and evenly distributed.
While the Dutch oven is preheating, prepare your bread dough according to your chosen recipe.
Once the Dutch oven is fully preheated, carefully remove it from the oven using oven mitts or pot holders. Place it on a heat-safe surface.
Gently transfer your shaped bread dough into the hot Dutch oven using parchment paper or a well-floured surface to prevent sticking.
Immediately cover the Dutch oven with its lid and place it back into the oven to begin the baking process. The sealed environment inside the Dutch oven will help trap the steam, creating a moist atmosphere that promotes a crusty exterior on the bread.
Follow the baking time as specified in your recipe, and then remove the bread from the Dutch oven to cool on a wire rack.
By properly preheating your Le Creuset Dutch oven, you can create a conducive baking environment for your bread, resulting in a beautifully textured and crusty loaf with a delicious, golden-brown crust.
Using Too Much Flour and Not Properly Shaping the Bread
When shaping the bread, it’s essential to use just enough flour to prevent sticking without over-flouring the dough, which may create a dry and floury crust. Additionally, proper shaping techniques contribute to a uniform rise and structure.
To shape the bread, gently patting the dough into a rectangle. Then, fold the dough in half and use the heel of your hand to seal the seam. Rotate the dough and repeat the folding and sealing process to create surface tension. This will help the bread maintain and rise evenly.
Next, place the dough seam-side down and use your hands to gently cup and rotate the dough, tucking the edges underneath to form a smooth and taut surface. This step is vital for creating an even structure and preventing the bread from spreading out too much during baking.
Put the dough on a baking sheet and cover it with a kitchen towel according to the recipe instructions. With the proper shaping techniques, you’ll be on your way to beautifully risen and structured loaves of bread.
Tips for Choosing the Right Le Creuset Dutch Oven for Bread Baking
When selecting a Le Creuset Dutch oven for bread baking, several factors should be considered to ensure the best results and a delightful bread-making experience.
Consider the Size and Shape of the Dutch Oven
The size and shape play a crucial role in the baking process. A spacious pot allows the bread to expand and rise evenly, while the shape determines the final form of the loaf.
Understanding the Material and Heat Retention Properties of Le Creuset Dutch Ovens
Being aware of the material and heat retention properties of Le Creuset Dutch ovens helps optimise the baking process. The cast iron material and excellent heat retention of Le Creuset pots contribute to the creation of exceptional bread.
Exploring Additional Features and Accessories for Bread Baking with Le Creuset Dutch Ovens
Le Creuset offers additional features and accessories that can enhance the bread-baking experience, such as tools for scoring the bread and specific lids that aid in creating steam for an ideal crust formation.


 Asmaa Alhashimy
  Le Creuset,Le Creuset Bread Recipe")